- In this section
- Introduction
- COM Add Ins
- Event Sinks
ATL COM Shared Add Ins Using C++ - The Easy Way
Doug Richards, Dotric Pty Ltd, August 2006.Contents
- Introduction
The MFC Way
The Kludge
Help On Host COM Interfaces
An Example - Three New Projects
Apply The Kludge
Connect To Microsoft Word
Modify The Microsoft Word Main Menu
Create A New Dialog
Create A New Interface
Some Visual Basic
Deployment
Introduction
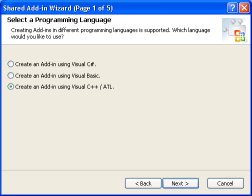
ATL COM Shared Add Ins provide the means of adding functionality to COM friendly applications like the Microsoft Office suite of programs. Examples of ATL COM Shared Add Ins include the Dotric DotReader program and the Dotric ShareWord program described elsewhere on this website. Both of these programs are accessed using extra menu items added to Microsoft Word.Creating a new Shared Add In is pretty straightforward. It is a case of fire up Microsoft Visual Studio 2002 (or something newer) and from the main menu select File, New and Project. In the New Project dialog, select Other Project Types and Extensibility from the tree view, then Select the Shared Add In template. Type in a project name and location and press OK to fire up the Shared Add-In Wizard. Press Next then select Create an Add-in using Visual C++/ATL and press Next again. Use the displayed tick boxes to select the applications (such as Microsoft Word) that you want to add functionality to and press Next again. The next two steps are largely a matter of personal preference, so complete these two and press Finish.
The MFC Way
If you followed the Introduction to this article carefully you now have a skeleton ATL COM Shared Add In project. However, to do ATL COM the easy way at least one MFC project is also required for its source code. I say at least one because if you plan to do more than one of these projects it is probably wise to create a separate MFC project for each host application and save the generated source code for future use. If at this point, you would much rather use the MFC and forget about ATL COM then I recommend the article Automating Microsoft Office 97 and Microsoft Office 2000 by Lori Turner, Microsoft Corporation, March 2000. This article may be obtained by going to http://support.microsoft.com/kb/253235/EN-US and ticking on Download the OffAutmn.exe package now.Anyway to generate some COM source code, fire up pretty much any version of Microsoft Visual Studio and from the main menu select File, New and Project. In the New Project dialog, select Visual C++ and MFC from the tree view, then select the MFC Application template. Type in a project name and location. Use a project name that includes the host application name and some indication that project is providing ATL COM Shared Add In source. Press OK to fire up the MFC Application Wizard. Press Next and select Single document as the Application Type. Now for the important part, if you are using Visual Studio 2005, press Next another five times to get to the Advanced Features page and tick the Automation tick box. If you are using some other version of Visual Studio then it is a case of find that Automation tick box and tick it! Press Finish to generate the MFC project.
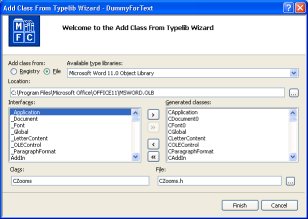
The process of generating the MFC COM class wrappers for a host application COM interface varies a bit between versions of Visual Studio. For Visual Studio 2005, from the main menu select Project and Add Class. Earlier versions of Visual Studio might called this the "Class Wizard". In the Add Class dialog select MFC from the tree view, then select the MFC Class From TypeLib template and press Add. In the Add Class From Typelib Wizard dialog select Add class from File using the appropriate radio button and press the "..." button to go hunting for the host application type library.
A type library may be a dll, exe, tlb or olb file which doesn't sound very helpful but it is largely a matter of trial and error. What I can tell you is that the Microsoft Office stuff is usually in the folder "C:\Program Files\Microsoft Office\OFFICE11", "C:\Program Files\Microsoft Office\Office" or whatever applies to your version of Microsoft Office. Type library file names for Microsoft Office applications are shown in the following table.
| Application | 2000 | XP | 2003 |
| Access | Msacc9.olb | Msacc10.olb | MSACC.OLB |
| Excel | Excel9.olb | Excel10.olb | EXCEL.OLB |
| Outlook | Msoutl9.olb | Msout10.olb | MSOUTL.OLB |
| PowerPoint | Msppt9.olb | Msppt10.olb | MSPPT.OLB |
| Word | Msword9.olb | Msword10.olb | MSWORD.OLB |
Once the required type library file has been located using the VS Wizards Select File dialog press Open and the Add Class From Typelib Wizard dialog will be populated with a number of interface options. I recommend pressing the ">>" button to select the lot. Press Finish to generate a whole swag of MFC COM class wrappers.
The Kludge
Click to copy CDotDispatchDriver source filesAfter following through with the previous section, you will have one or more MFC projects with swags of COM wrappers. Looking through the source files for these COM wrappers, it can be seen that each and every one is derived from the class COleDispatchDriver. Referring to one of Microsoft's wall charts for the MFC reveals that COleDispatchDriver is described as a "Support Class" and is not derived from any other MFC class. Now COleDispatchDriver is defined in afxdisp.h but if you attempt to include this header file in an ATL COM Shared Add In project you will find yourself adding a lot of other header files on a road going nowhere.
My approach then was to cut out all the unnecessary stuff from the include file afxdisp.h and its associated source file oledisp2.cpp. This exercise was a pretty ruthless process of getting the mungrel to compile and was completed in less than 2 hours. However, I have yet to find fault with the end result which may be downloaded by clicking here. The first point to be noted is that the name of the class has been changed to CDotDispatchDriver to avoid any confusion by myself or the compiler with the original MFC class. Secondly, during the course of the exercise a DotOleErrors class was also created. Thirdly, COleDispatcherDriver makes frequent use of the MFC class CString. Fortunately, ATL also has a class called CString that works in much the same way and is defined in atlstr.h.
The steps from here to neat object oriented ATL COM Shared Add In code are as follows:
- Copy the DotDispatchDriver source files into your Shared Add In project
- Identify the COM wrappers that you need in the one or more MFC projects generated for the purpose
- Copy the COM wrapper files identified in step 2, into your Shared Add In project
- Use Find and Replace to find every instance of the class name COleDispatchDriver and replace it with the class name CDotDispatchDriver.
- Modify the include declarations in the COM wrapper files as necessary
szFunction = OLESTR("ActiveDocument");
hr = pDispApp->GetIDsOfNames (IID_NULL, &szFunction, 1, LOCALE_USER_DEFAULT, &dispid_ActiveDoc);
hr = pDispApp->Invoke (dispid_ActiveDoc, IID_NULL, LOCALE_USER_DEFAULT, DISPATCH_PROPERTYGET, &dpNoArgs, &vResult, NULL, NULL);
pDispActiveDoc = vResult.pdispVal;
will turn into code like this:
m_oDocument = m_oWordApp.get_ActiveDocument();
Help On Host COM Interfaces
By now you have probably noticed that there isn't much information available on the specifics of individual COM interfaces. One source of information is the MFC COM wrappers themselves. Quite a bit of useful information can be gleamed by looking through the source code.The OLE/COM Object Viewer is a useful tool. It can be found in the folder "Common7\Tools\Bin" within the Visual Studio folder. The executable file is called "OleView.exe". Alternatively, OLE/COM Viewer can be made a menu item in Visual Studio by selecting Tools and External Tools.... Once the OLE/COM Object Viewer is fired up press the tool bar button with the three red triangles to "View Typelib". In the standard Open dialog seek out the type library file for the host application and press Open. A new window then opens containing the source code for the type library file. If desired this source code may be saved as an IDL file.
The Microsoft Office suite of programs provide COM interface information with their Visual Basic macro editor. To get to this information, fire up the Microsoft Office program of your choice and from the main menu select Tools, Macro and Visual Basic Editor. Once the Microsoft Visual Basic editor is running, from its main menu select Help and Microsoft Visual Basic Help. A good starting point with this help is to search for "Object Model". The object model diagram thus found provides a convenient way of drilling down to more detailed information. This information is of course Visual Basic centric but the conversion to C++ is usually fairly self evident.
Creating a C# project is also a useful thing to do. To do this fire up Visual Studio and from the main menu select File, New and Project. In the New Project dialog, select C# and Windows from the tree view, then select Windows Application as the template. Type in a project name and location and press OK. Once a new C# project has been created, from the Visual Studio main menu select Project and Add Reference. In the Add Reference dialog switch to the COM panel. This panel typically contains a comprehensive list of type library files which should include the one for your intended host application. So select your host application and press OK. Change to the Object Browser view in the central code viewer area. If the Object Browser panel isn't one of the available panels, then from the main menu select View and Object Browser to make it so. Looking through the Object Browser tree view you will find an Interop class with a class representing the COM interface for your selected host application derived from it. Expanding this tree node will reveal a comprehensive description of the host application COM inteface. If this is enough to make you give up on C++ and use C# instead then I recommend the article An Introduction to Programming Outlook 2003 Using C# by Andrew W. Troelsen, Intertech Training, June 2004. This article may be found at http://msdn.microsoft.com/library/default.asp?url=/library/en-us
/dv_vstechart/html/ol03csharp.asp
Google is of course always a gold mine of information.
An Example
Click to copy WordFindFacility source filesThree New Projects
The initial desire for examples is that they be instructive, novel and maybe even useful. However, in reality I have found all the best text books and articles provide examples that are nothing more than instructive. Therefore, the example provided here merely adds a word find facility to Microsoft Word. Totally useless since of course, Microsoft Word already has a word find facility, but worse than that this word find facility is modal. This modal behaviour occurs because COM provides synchronous communication. Thus when your Shared Add In has program control Microsoft Word does not and vice versa. This example uses Microsoft Visual Studio 2005 and Microsoft Word 2003.As described in the Introduction to this article, the first thing to do is create a new Shared Add In project. So fire up Visual Studio 2005 and start a new project. In the New Project dialog, the Project type is Other Project Types and Extensibility. The template is Shared Add In and use the project name "WordFindFacility". On page 1 of the Shared Add In Wizard, Create an Add-in using Visual C++/ATL. On page 2 the host application is Microsoft Word (untick the rest). On page 3 make "Word Find Facility" the name and description. On page 4 tick both I would like my Add-in to load when the host application loads and My Add-in should be available to all users of the computer it was installed on, not just the person who installs it. On page 5 press Finish.
If you haven't already done so, now is the time to create two MFC projects as described in The MFC Way section of this article. One of these projects is of course to generate COM wrappers for the Microsoft Word interface. The other is for the common Microsoft Office interface. In both cases the project is an MFC Application where the application type is a Single document and the Automation tick box has been ticked on the Advanced Features page. In each of these projects select Project and Add Class from the main menu. The class to be added is a MFC Class From TypeLib. In the Add Class From TypeLib Wizard dialog, use the radio buttons to select Add class from File and press the "..." button to locate the relevant file. For Microsoft Word the file is MSWORD.OLB in the folder "C:\Program Files\Microsoft Office\OFFICE11". For Microsoft Office the file is MSO.dll in the folder "C:\Program Files\Common Files\Microsoft Shared\OFFICE11". In both cases press the ">>" to add all class.
Apply The Kludge
COM Interface wrappers created, the following files need to be copied across from the MFC Project containing the Microsoft Word COM interface wrappers into the new WordFindFacility project:- CApplication.h
- CDocument0.h
- CWords.h
- CRange.h
- CCommandBarPopup.h
- CCommandBarButton.h
- CCommandBar0.h
- CCommandBars.h
- CCommandBarControl.h
- CCommandBarControls.h
#pragma once
#include "DotDispatchDriver.h"
While near the top of these header files, the line commencing #import must be removed. If you have been following the text diligently, it might be wise to try that first compile at this point.
Connect To Microsoft Word
With a happy compiler it is at last time to start typing code. Firstly, some sort of mechanism for calling into Microsoft Word is required. Referring to the wizard generated Connect.cpp source file in the WordFindFacility project, there is a method called OnConnection that is passed an IDispatch pointer that serves the purpose nicely. So in the Connect.h header file add the following line amongst the other include declarations:#include "CApplication.h"
then add the following lines to the CConnect class declaration:
- private:
- CApplication m_oWordApp;
Now going back to the Connect.cpp source code, add the following lines to the OnConnection method discussed earlier:
- try
{ - m_oWordApp.AttachDispatch(pApplication);
- }
catch( DotOleException* e )
{ - DotOleErrors::OleErrorMessages(e);
- }
catch( DotOleDispatchException* e )
{ - DotOleErrors::DispatchErrorMessages(e);
- }
}
Also the following line must be added amongst the other include declarations:
#include "DotOleErrors.h"
What has been done here is of course the putting of a wrapper around the IDispatch pointer. However, when using this stuff it must be kept in mind that despite appearances, interprocess communication is going on here so frequent use of try/catch statements is advisable.
Modify The Microsoft Word Main Menu
The next job is to modify the Microsoft Word main menu to include our word find facility. This could be a case of adding a menu item to an existing menu bar option, but for this example a new menu bar option will be added as well. So in the Connect.h header file add the following lines amongst the other include declarations:#include "CCommandBarPopup.h"
#include "CCommandBarButton.h"
then add the following lines to the CConnect class declaration:
- private:
- CCommandBarPopup m_oWordFindPopup;
CCommandBarButton m_oWordFindButton;
The two variable declarations thus added represent the new menu bar option and the new menu item respectively. Whilst in the Connect.h file the following lines can also be added to CConnect class:
- private:
- void AddMenuItems();
void RemoveMenuItems();
These are of course the declarations for the methods that will add and remove the menu items for the word find facility. Switching back to the Connect.cpp file, the new method AddMenuItems is added to the end of file, commencing with the following lines:
- void CConnect::AddMenuItems()
{ - try
{ - CCommandBars oCommBars = m_oWordApp.get_CommandBars();
CCommandBar0 oMenuBar = oCommBars.get_ActiveMenuBar();
CCommandBarControls oMenuBarControls = oMenuBar.get_Controls();
long count = oMenuBarControls.get_Count();
for (long iii=1; iii<=count; iii++)
{ - CComVariant vLong(iii);
CCommandBarControl oControl = oMenuBarControls.get_Item(vLong);
if ( oControl.get_Caption().Compare( "&Window" ) == 0 )
{ -
MsoControlType type = msoControlPopup;
m_oWordFindPopup = oMenuBarControls.Add( CComVariant(type), vOpt, vOpt, CComVariant(iii), vOpt);
m_oWordFindPopup.put_Tag("WordFindFacility Popup");
m_oWordFindPopup.put_Caption("&My Menu");
m_oWordFindPopup.put_Visible(TRUE);
m_oWordFindPopup.put_TooltipText("A Fairly Useless Word Find Facility");
break; - }
What is happening here is the Microsoft Word main menu bar control is obtained and each menu bar option is checked in turn to locate the standard Window option. A new menu bar option is then inserted ahead of the Window option. A number of properties are set for new menu bar option including the caption My Menu. Now of course the menu item itself must be added. This is done with the following code which is appended to the code for the AddMenuItems method shown above.
CCommandBarControls controls = m_oWordFindPopup.get_Controls();
MsoControlType type = msoControlButton;
m_oWordFindButton = controls.Add( CComVariant(type), vOpt, vOpt, CComVariant(1), vOpt);
m_oWordFindButton.put_Tag("WordFindFacility Popup");
m_oWordFindButton.put_Caption("&Find...");
m_oWordFindButton.put_Visible(TRUE);
m_oWordFindButton.put_TooltipText("A Fairly Useless Word Find Facility");
MsoButtonStyle style = msoButtonCaption;
m_oWordFindButton.put_Style(style);
m_oWordFindButton.put_OnAction( "WordFindFacility" );
Here a menu item with the caption Find... is added to the newly created menu bar option. The action for this menu item is set using the put_OnAction method. The action for the new menu item is to call a Microsoft Word macro with the name "WordFindFacility". This macro described later will perform the call back whenever the menu item is selected. This is not the most elegent way of getting Microsoft Word to call back. The use of event sinks is much sexier, but in the interests of simplicity the way of the macro will be used in this article. There is also some instructive value in viewing your Add In from the Microsoft Word end.
To finish off the AddMenuItems method the catches for the mandatory try are appended to the end as follows:
- }
catch( DotOleException* e )
{ - DotOleErrors::OleErrorMessages(e);
- }
catch( DotOleDispatchException* e )
{ - DotOleErrors::DispatchErrorMessages(e);
- }
The code for the RemoveMenuItems method is as follows:
-
void CConnect::RemoveMenuItems()
{ -
try
{ -
CCommandBars oCommBars = m_oWordApp.get_CommandBars();
CCommandBar0 oMenuBar = oCommBars.get_ActiveMenuBar();
CCommandBarControls oMenuBarControls = oMenuBar.get_Controls();
long count = oMenuBarControls.get_Count();
for (long iii=1; iii<=count; iii++)
{ -
CComVariant vLong(iii);
CCommandBarPopup oPopup = oMenuBarControls.get_Item(vLong);
if ( oPopup.get_Caption().Compare( "&My Menu" ) == 0 )
{ -
CCommandBarControls oPopupControls = oPopup.get_Controls();
while ( oPopupControls.get_Count() > 0 )
{ - CCommandBarButton button = oPopupControls.get_Item( CComVariant((long)1) );
- button.Delete(vOpt);
-
}
oPopup.Delete(vOpt);
count--; - }
catch( DotOleException* e )
{ - DotOleErrors::OleErrorMessages(e);
-
}
catch( DotOleDispatchException* e )
{ - DotOleErrors::DispatchErrorMessages(e);
- }
- }
This method is not unlike the AddMenuItems method. Once again the control to the Microsoft Word main menu bar is obtained and a search is conducted along the menu bar. In this case however, occurrences of the menu option My Menu is the search target. If any are found, the menu bar option and the menu items beneath it are deleted. This method has been written fairly defensively. It is possible for the same menu option to appear multiple times when things go horribly wrong. So a comprehensive clean up is wise.
Clearly the following include declarations must appear near the top of the Connect.cpp source file amongst the other include declarations to account for the extra data types used in the methods AddMenuItems and RemoveMenuItems:
#include "CCommandBar0.h"
#include "CCommandBars.h"
#include "CCommandBarControl.h"
#include "CCommandBarControls.h"
However, the careful reader may have also noticed the data types MsoControlType and MsoButtonStyle which aren't in any of the available header files. The answer here lies with the OLE/COM Viewer described in the Help On Host COM Interfaces section of this article. So fire up the OLE/COM Viewer and perform a "TypeLib View" on the Microsoft Office type library file MSO.dll. It is here that MsoControlType and MsoButtonStyle can be found and are defined as follows:
- typedef enum {
- msoControlCustom = 0,
msoControlButton = 1,
msoControlEdit = 2,
msoControlDropdown = 3,
msoControlComboBox = 4,
msoControlButtonDropdown = 5,
msoControlSplitDropdown = 6,
msoControlOCXDropdown = 7,
msoControlGenericDropdown = 8,
msoControlGraphicDropdown = 9,
msoControlPopup = 10,
msoControlGraphicPopup = 11,
msoControlButtonPopup = 12,
msoControlSplitButtonPopup = 13,
msoControlSplitButtonMRUPopup = 14,
msoControlLabel = 15,
msoControlExpandingGrid = 16,
msoControlSplitExpandingGrid = 17,
msoControlGrid = 18,
msoControlGauge = 19,
msoControlGraphicCombo = 20,
msoControlPane = 21,
msoControlActiveX = 22,
msoControlSpinner = 23,
msoControlLabelEx = 24,
msoControlWorkPane = 25,
msoControlAutoCompleteCombo = 26 - } MsoControlType;
- typedef enum {
- msoButtonAutomatic = 0,
msoButtonIcon = 1,
msoButtonCaption = 2,
msoButtonIconAndCaption = 3,
msoButtonIconAndWrapCaption = 7,
msoButtonIconAndCaptionBelow = 11,
msoButtonWrapCaption = 14,
msoButtonIconAndWrapCaptionBelow = 15 - } MsoButtonStyle;
The simpliest way of dealing with the need for type definitions for MsoControlType and MsoButtonStyle at this stage, is to copy and paste the above code directly into the Connect.cpp source file.
Obviously the methods AddMenuItems and RemoveMenuItems are not going to have any affect unless they are called as part of the Add In process. So add the following lines to the wizard generated method OnStartupComplete in the Connect.cpp source file:
RemoveMenuItems();
AddMenuItems();
Then add the following line to the wizard generated method OnBeginShutdown:
RemoveMenuItems();
To compile and install the Add In to see how it looks so far, proceed as follows:
- Compile the WordFindFacility project. To do this perform a right button mouse click over the project name WordFindFacility in the Solution Explorer window and select Rebuild
- Compile the WordFindFacilitySetup project. To do this perform a right button mouse click over the project name WordFindFacilitySetup in the Solution Explorer window and select Rebuild
- Install the Add In. To do this perform a right button mouse click over the project name WordFindFacilitySetup in the Solution Explorer window and select Install
At this point I should mention that if you end up with a menu bar option that won't go away even when you uninstall the Add In, the procedure to get rid of it is as follows. Firstly, in Microsoft Word select Tools and Customize.. from the main menu. Then simply grab the unwanted menu bar option using the left mouse button and drag it across to the displayed Customize dialog and close the dialog.
Create A New Dialog
Right, so far we have a new menu item in Microsoft Word that is doing not very much. Time to create a dialog. So fire up Visual Studio and right click on the WordFindFacility project in the Solution Explorer window. From the popup menu select Add and Class.... In the Add Class dialog select ATL from the tree view and ATL Dialog as the template. Press Add, type in "WordFind" as the short name and press Finish. On a personal note, I find the habit of some of the ATL wizards of putting the executable body of class methods in header files extremely irritating. So much so that the first thing I do at times like this is a bit of cutting and pasting to put things right. I encourage you to get into WordFind.h and WordFind.cpp and do likewise - method declarations only in header files. Now switch from the Solution Explorer to the Resource View and in the tree view, double click on the dialog with the label IDD_WORDFIND. Work with the resource editor until you end up with something like the following:

Now to some code for the new dialog. Firstly, ATL does provide a wrapper for its dialog controls which will be used here on the edit control. So add the following lines to CWordFind class in the WordFind.h header file.
- private:
- CWindow m_cWord;
Then add the following line to the OnInitDialog method which I trust is now in the WordFind.cpp source file.
m_cWord.Attach( GetDlgItem( IDC_WORD ) );
The Microsoft Word document to be searched will be passed into the CWordFind class during construction, so amongst the other include declarations near the top of the WordFind.h file add the following line:
#include "CDocument0.h"
In the same file, modify the CWordFind constructor declaration to appear as follows:
CWordFind( CDocument0* poDocument );
Also in the same file, add the following lines to CWordFind class:
- private:
- CDocument0* m_poDocument;
Finally, modify the constructor code which I trust is now in the WordFind.cpp source file to appear as follows:
- CWordFind::CWordFind( CDocument0* poDocument )
{ - m_poDocument = poDocument;
- }
During the course of the word searching process, variables representing an index to the current word and the total number of words need to be maintained. Accordingly, the following line needs to be added amongst the other include declarations near the top of the WordFind.h header file:
#include "CWords.h"
Then the following lines of code need to be added to the CWordFind class in the same file.
- private:
- long m_lTotalNumberOfWords;
long m_lWordIndex;
CWords m_oWords;
Finally the following lines need to be added to the CWordFind class constructor in the WordFind.cpp source file:
m_lWordIndex = 1;
m_oWords = poDocument->get_Words();
m_lTotalNumberOfWords = m_oWords.get_Count();
What is happening here is fairly straight forward. An object is obtained from the supplied document that represents the words in the document. The number of words is then obtained from the "Words" object.
Before moving on to the word find routine itself another include declaration is required. This time in the WordFind.cpp source file, the following line needs to be added amongst the other include declarations:
#include "CRange.h"
Now to the business of the word search. Add the following lines to the OnBnClickedFind method in the WordFind.cpp source file:
- CString text;
m_cWord.GetWindowText( text );
while ( m_lWordIndex <= m_lTotalNumberOfWords )
{
- CRange oRange = m_oWords.Item( m_lWordIndex );
m_lWordIndex++;
CString word = oRange.get_Text();
word.TrimRight();
if ( text == word )
{ - oRange.Select();
return 0; - }
::MessageBox( NULL, text + " Not Found", "Not Found", MB_OK|MB_ICONSTOP );
Create A New Interface
Strangely, Visual Studio doesn't appear to provide an automated way of creating a new interface. So the first thing to do is create a globally unique ID (GUID) for the proposed interface. Microsoft provide a tool to do this. It is in the folder "C:\Program Files\Microsoft Visual Studio 8\Common7\Tools" and the executable file is "guidgen.exe". Just fire it up and instantly you have a new GUID.Armed with a new GUID, go back to Visual Studio and open the file AddIn.idl from the Solution Explorer. Using your new GUID not mine, add the following lines to AddIn.idl straight after the import statements:
- [
- object,
uuid( BABAF1C5-12A9-406b-A76C-49461A918286 ),
dual,
nonextensible,
helpstring("IWordFindInterface Interface"),
pointer_default(unique) - ]
interface IWordFindInterface : IDispatch
{
};
Also in the same file within the Connect coclass within the WordFindFacilityLib library, replace the following line:
[default] interface IUnknown;
With this:
[default] interface IWordFindInterface;
Now compile the project and perform a right button mouse click over the CConnect class in the Class View. From the popup menu select Add and Implement Interface.... The IWordFindInterface interface just defined in the AddIn.idl file will now be listed in the Implement Interface Wizard dialog. Press the ">" button to select IWordFindInterface and press Finish.
Referring to the list of classes in the Class View window, it can be seen that IWordFindInterface is now an entry. So perform a right mouse button click over IWordFindInterface and from the popup menu select Add and Add Method.... In the Add Method Wizard dialog, give the new method the name "WordFind" and press Finish. Opening the Connect.cpp source file will reveal that the new WordFind method has been added to the CConnect class. This WordFind method is the one that Microsoft Word will call via IWordFindInterface to display the dialog coded earlier. Accordingly add the following lines to the WordFind method:
- try
{ - CDocument0 oActiveDocument = m_oWordApp.get_ActiveDocument();
CWordFind dlg( &oActiveDocument );
dlg.DoModal(); - }
catch( DotOleException* e )
{ - DotOleErrors::OleErrorMessages(e);
-
}
catch( DotOleDispatchException* e )
{ - DotOleErrors::DispatchErrorMessages(e);
- }
This code requires some additional include declarations, so near the top of the Connect.cpp source file amongst the other include declarations, add the following lines:
#include "WordFind.h"
#include "CDocument0.h"
By now my seemingly excessive use of local variables to define COM wrapper classes may have been noted. Anyone with COM experience will have heard of reference counters. A reference counter determines the lifetime of a COM object. The COM wrappers described in this article do a pretty good job of hiding all this reference counter stuff. However, the existence of reference counters cannot be totally ignored. One must therefore maintain very tight control over the construction and destruction of COM wrapper classes. I find the generous use of local variables to be a fairly painless way of achieving this tight control. When developing Shared Add Ins, it pays to occasionally check the Windows Task Manager to ensure that the host application is in fact closing down when you believe it should be closing down. If close downs are not occurring predictably and you have been using COM wrapper classes religiously, then check that you understand the life cycle of each and every COM wrapper class instance.
To ensure that Microsoft Word does not create a new instance of CConnect class when it does the call back the following line needs to be added to the Coonect.h file amongst the other "DECLARE" macros:
DECLARE_CLASSFACTORY_SINGLETON(CConnect)
If you try and compile at this stage, you will quickly realize that the wizard generated stuff actually does not compile. The problem being that the linker cannot find the _LIBID_WordFindFacilityLib GUID. The solution then is to in the Connect.h file, replace this line:
public IDispatchImpl<IWordFindInterface, &__uuidof(IWordFindInterface), &LIBID_WordFindFacilityLib, /* wMajor = */ 1, /* wMinor = */ 0>
With this line:
public IDispatchImpl<IWordFindInterface, &__uuidof(IWordFindInterface), &__uuidof(WordFindFacilityLib), /* wMajor = */ 1, /* wMinor = */ 0>
Now you should be able to rebuild the WordFindFacility and WordFindFacilitySetup projects and perform a re-install. That concludes the work at the Add In end of the project. Now all that remains is to set up Microsoft Word to actually make the call.
Some Visual Basic
As mentioned previously the most elegant way of handling callbacks from the host application is by means of event sinks. Certainly they avoid the hassle of adding scripts at the host end. However, for simplicity and its instructive value adding a script at the host end is exactly what we will do here. So fire up Microsoft Word and from the main menu select Tools, Macro and Macros.... In the Macros dialog press Edit. Once in the Visual Basic editor the first thing to do is locate the WordFindFacility type library. From the Visual Basic Editor main menu select Tools and References.... With any luck the WordFindFacility type library will simply appear in the list of Available References in the Reference dialog. If it does then simply tick it and press OK. If not then press Browse... and go hunting for that AddIn.tlb file associated with the WordFindFacility project. To confirm that the Visual Basic editor does indeed know about the WordFindFacilty, from the main menu select View and Object Browser. In the Object Browser dialog you should be able to select WordFindFacilityLib. Having done that the Connect class and its WordFind method should be listed.To add the required macro from the Visual Basic Editor main menu select Insert and Procedure...". In the Add Procedure dialog type "WordFindFacility" as the name, leave the Type as Sub and press OK. To the newly created procedure add the following lines:
Dim oWordFind As Object
Set oWordFind = New WordFindFacilityLib.Connect
oWordFind.WordFind
So now if you go back to the main Microsoft Word window, type in some text and select My Menu and Find..., your new word find facility should be operational.
Deployment
Now that you have successfully created an Add In you will know doubt want some way of distributing it. During the course of project development, installing the Add In has been a simple case of a right mouse click over WordFindFacilitySetup and selecting Install. However, if you have a look inside the WordFindFacilitySetup folder that was created by Visual Studio as part of the project, you will find that WordFindFacilitySetup is a project on its own complete with its own Debug and Release folders. In the Debug or Release folder is the WordFindFacilitySetup.msi file which is pretty much all you need to install the Add In. An msi file is of cource a Windows Installer database file, which in this case actually has the executable code for the Add In embedded within it. Incidently Microsoft actually has a tool for creating and editing msi files called orca.exe. Details may be found at http://msdn.microsoft.com/library/default.asp?url=/library/en-us/msi/setup/orca_exe.aspGetting rid of an Add In requires the use of Add or Remove Programs accessed via the Start button and Control Panel